
How to pack
What do I essentially have to take along with me on my chosen travel destination? How the hell will it all fit into one single backpack? How can I avoid unnecessary weight or save money on equipment?
These were the questions that came to my mind when I was about to go on my very first three-month backpacker trip to Australia in 2002. As travel blogs weren't popular back then and none of my friends had ever gone on a comparable trip, I had to figure out nearly everything on my own. Although I survived quite well with probably the heaviest backpack on the planet, there was an obvious need for optimization. Over the years my strategies improved and nowadays packing my backpack is a routine. If you are interested I am happy to share my experiences and opinion with you.
Your Backpack:
First of all you need a proper "backpack" of course. Depending on your ambitions you can choose from a wide range of products differing in quality, size and price. However if you already know that you will just go on one journey or you first want to check out if backpacking is your thing at all, the cheapest option is to borrow one from a person you know. You can also check out some websites where people sell their used stuff. Future frequent travelers or people that intend to do lots of (multi-day) hikes with a lot of (camping) equipment should spend more time and money on good equipment. The human back is a sensitive part of the body and health problems caused by wrong postures should not be underestimated. It is best to visit a renowned outdoor shop and seek advice from specialized shop assistants who will help you find the right model for your personal demand and adjust it to your body properly. A capacity of 50 to 60 liters is more than enough because the overall goal is to have a backpack being light in weight and small in pack volume! Also make sure to check out backpacks that offer a convenient front zip opening for quick access to your belongings such as products of the Deuter Aircontact Pro series. In case you don't intend buying a backpack with a zip opening, please note that the more pockets your backpack provides, the easier it is to organize your personal belongings and the better you reach your items later. Having only a big sack with just one opening means you have to reach all your stuff from top down which is often not possible and therefore requires unpacking a large part of your stuff. This can get pretty annoying at some point. Moreover, consider attaching additional pockets to the side of your backpack (see the yellow arrow in picture 1 below). But don't put valuables as well as other items in there that you don't want to miss. And in case you do, use small locks for moments when you can't keep an exye on your belongings (see the red arrow in picture 1 below). By far the toughest times for your backpack will probably be at the airports because it will be thrown onto conveyor belts and rudely flung to hundreds of other suitcases and bags. Especially the straps of your backpack and additionally attached pockets are endangered.
To avoid damage I always wrap around a robust plastic bag (10 Euros - see the yellow arrow in picture 2 below). It also serves as an additional protection against unwanted eyes as well as dirt or rain e.g. when transported on the roof of a bus or train. Putting your backpack into a plastic bag might be a bit more work but in my opinion it's worth it because you want to use your bag as long as possible or have to give it back afterwards to the person you borrowed it from.
Tip: Tell the guys at the airport check-in counter to wrap around the baggage tag exactly as shown in picture 2 below (red arrow) to avoid the loss of your baggage!
In addition to your large backpack you need a small "daypack". You can take it on board of flights as hand luggage and also use it on various daytrips of your journey (e.g. short excursions, city walks, hikes,...). Again I prefer multi-pocket solutions, especially outside pockets that fit drinking bottles, so that they are easy to reach. Furthermore, my daypack has an air circulation system at the back to avoid strong transpiration.
What to pack:
Packing light in weight and small in volume makes your journey more comfortable and simple. You do not need to buy and take equipment for every possible situation with you since you can probably rent or buy extraordinary items at your travel destination when required. Only do so if you are going to very remote or extremely cold places, if you plan to camp or to do other activities that require much special gear (which makes no sense to rent after arrival). For example, when I climbed Kilimanjaro (Tanzania) in 2015, I brought my own hiking boots as blisters can ruin the whole project. in contrast, I decided to rent some of the alpine clothing on site to save weight and space which I needed for the other four weeks of my journey.
Regarding clothing in general, I would like to point out that you must try to keep it to a necessary minimum! You will probably find laundry services around or simply wash them with detergent in the sink of your hostel's bathroom. Therefore the length of your stay does not have a significant influence on what and how much to pack. For colder destinations put on more layers of the standard clothes instead of taking along additional jackets etc. Furthermore you should try to replace clothes (and towels) made of cotton with functional materials. These are usually lighter, smaller and dry quicker.
Packing list:
An individual packing list depends on different factors such as your travel destination (e.g. climate), personal interests (e.g. photography) and planned activities (like mentioned above). In the following you can see my personal (guy's) packing check list that I always take a look at while packing my backpack. In each specific case I decide whether I fall back on these things or not but the list guarantees that I do not forget an important item. I hope this will help you setting up your individual packing list for your upcoming trip.
How to pack:
Now you know WHAT to pack. The following part shows you HOW to fit everything into your backpack properly and contains some additional useful packing strategies. Packing your bag can be exciting as it means you are only one step ahead of leaving your everyday life behind you. First, collect everything that you think you might need on your journey. You can use the packing check list above. Second, spread everything out on the floor and arrange similar items in piles. Do you think this could all fit into your backpack (and daypack)? It should, because otherwise you have probably chosen many more things than I suggested on my check list. Remember, you need to start packing from bottom to top whereby it is advisable to put the things that you won't need often or later on your trip at the bottom. Others should be put higher. Tip: Do not fold your clothes but roll them to avoid big creases!
Make sure to fully use the space available, especially the corners of your backpack as there is much hidden extra space. Socks and underwear can easily fit here. A regular backpack often goes with a separate bottom pocket with a zip. I use it for my shoes and other robust stuff that does not break easily. As the additional side pockets and the part on the very top of the backpack are usually seperated and within easy reach, you can put things here that are often used or that will definitely be used withing the next one or two days (e.g. two pairs of socks, some underwear, one new t-shirt and your toilet bag). Anyway, just give it a try! And if you are not satisfied with the result unpack everything and try again. You will soon find out about the best way to pack your stuff for yourself. Good luck packing your backpack and enjoy your trip!
17.12.2016 - Chris
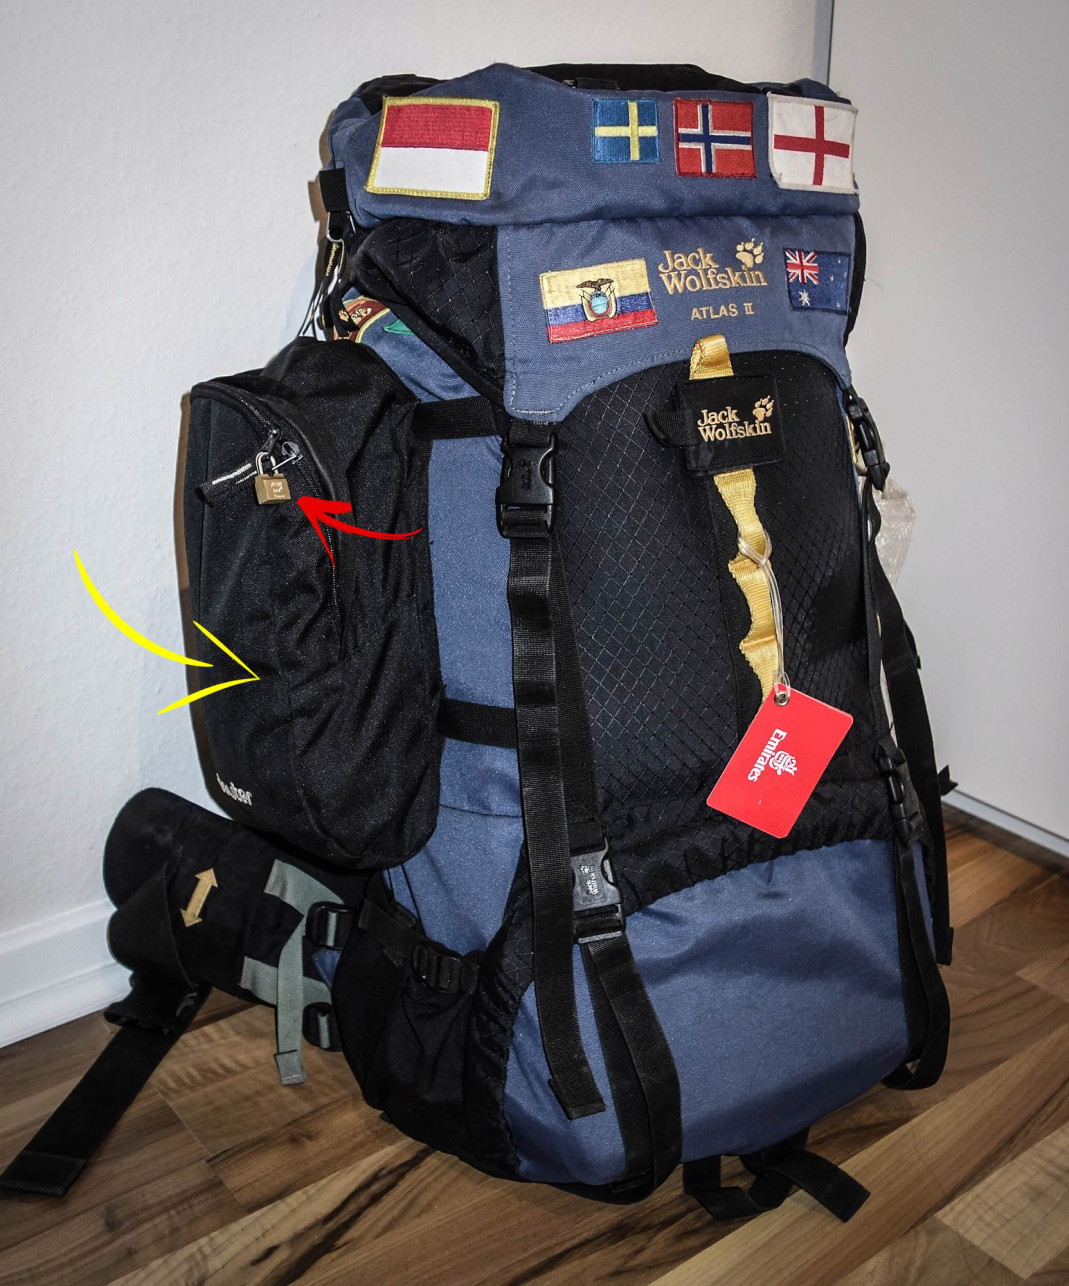
Picture 1: Additional pocket, locked
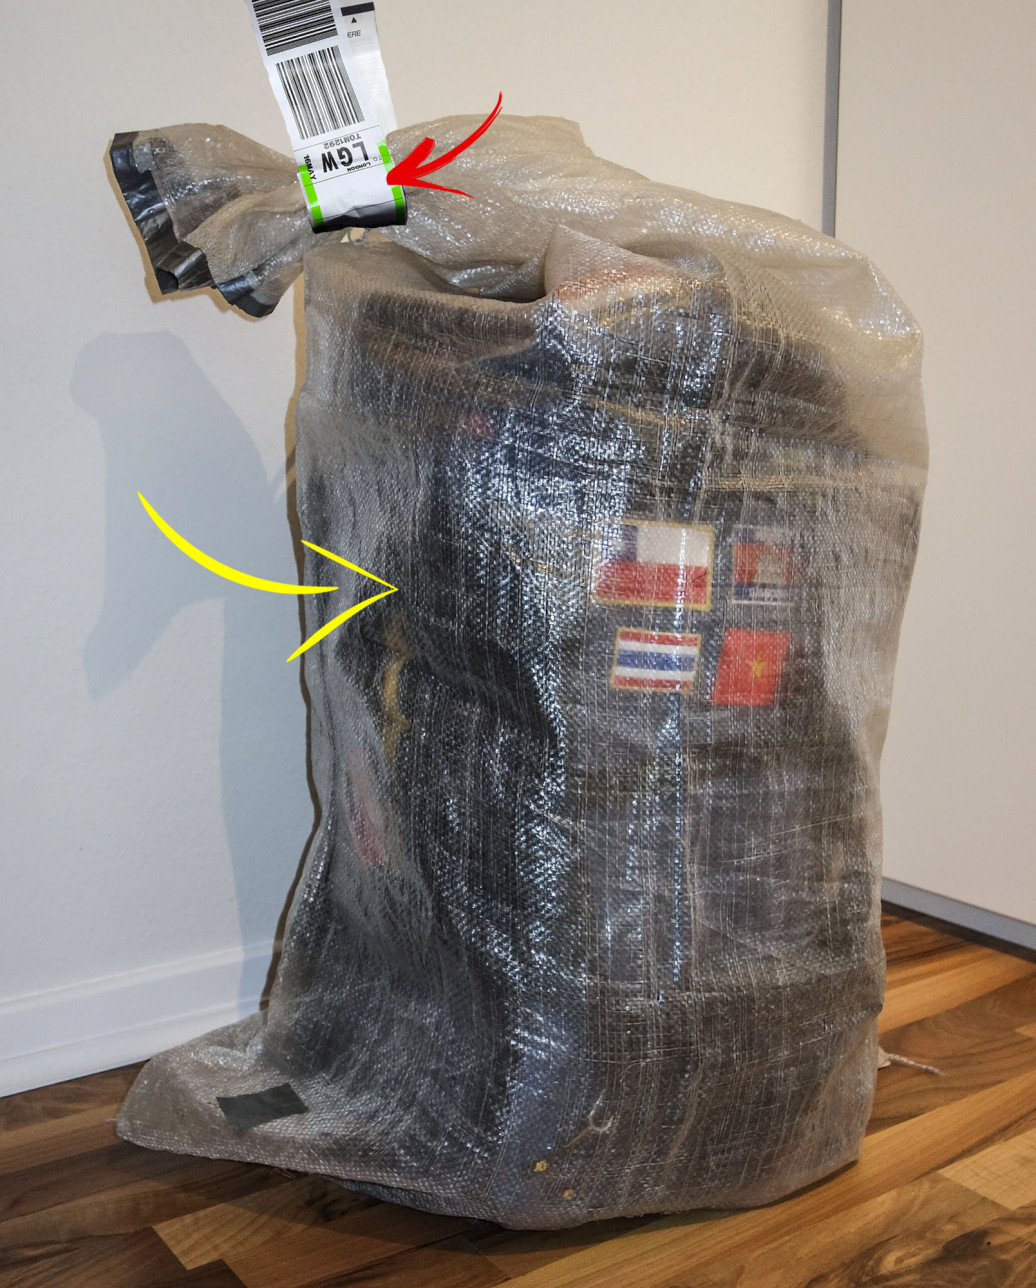
Picture 2: Plastic sack with baggage tag
